The bonding process
Video clips
Glue technique
For easier work with IMIT products we have prepared an illustrative video demonstration of the technical process of gluing of IMIT tiles with the use of IMIT construction chemistry.
Thermal insulation and bonding of tiles
Take a look at the IMIT facade insulation process.
Picture progress
Tile bonding technique
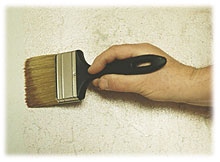 1. Preparation of background
The underlying surface must be completely dry, undamaged. The surface must be topped with a special penetration primer (brush, roller) which ensures the above properties and, moreover, ensures the non-absorbency of the substrate so that the adhesive does not quickly become brittle after application. At the earliest after 1 hour, we can begin preparing for the application of the adhesive.
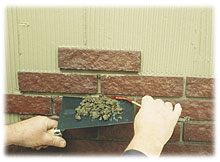
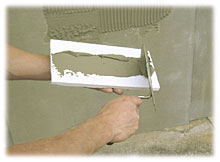 2. Application of adhesive
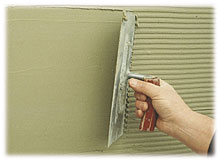
a) Mix the gluing adhesive according to the instructions on the adhesive package. We mix only the amount we can process before it starts.
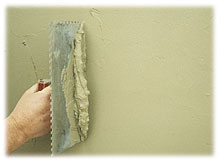
b) Apply a glue with a toothbrush with a teeth size of 8-10 mm. Be careful to apply too much area, glue can dry or make "skin".
c) According to the latest findings on Keraton® tile bonding, it is advisable to undermine the glue and the tiling itself. Completely enough, spatula or spatula on the glued part of tiles is sufficient.
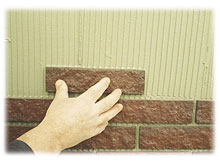 3. Bonding of tape tiles
a) Before tiling, we always open more tiles and each tile is always taken in two of each.
b) Wrap around the back side of the tile to open the back of the tile for better grip.
c) We make the bonding of the cladding very delicately and do not press on the cladding, not even with a rubber bobbin, the cladding with uniform pressure with the movement to the sides in the adhesive will settle.
d) When cornering is used, we always begin by gluing corner elements.
e) Keraton® tiles can be glued with a joint, this bonding corresponds to a pack of 1 m2 in cardboard (joint 8-12 mm) or without joints - 0,9 m2.
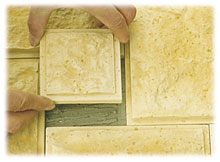 4. Bonding of multi-dimensional tiles (Hakl, Pískovec)
a) Before tiling, we will always open more tiles and we will always take individual tiles after each of them.
b) Hakl tile is glued to the meeting and therefore no pairing is necessary. When laying tiles, care must be taken to ensure that the tiles are tightly fitted. The basic rule for the composition of individual dimensions is to break the resulting joint to a maximum of 60 cm of unbound joint - joints. It is advisable to create a balance of the use of individual dimensions before tiling. All dimensions are packed in cardboard box = 1 m2.
c) Facing Sandstone is glued with a joint of 10 mm or greater. The bonding itself is the same as for standard HAKL tiling.
5. Cross-section - cutting of tiles
All Keraton® tiles can be shortened - cut. The best way is cutting into a table cutter using a diamond or black disk for concrete, stone. Manual bursts of so-called "flex" can also be used to cut a small amount of cladding. Underwater cutting!
 6. Pair jointing with IMIT Spára®
The grout is mixed according to the instructions on the packaging, diluted only with minimal water and as if the "wet sand" is pushed through the joint with a spatula into the joints and smoothes. The dry form of the spindle is necessary because the soiled tile after drying can be easily cleaned with a rice brush.
7. Impregnation - IMIT®Impreg
It is recommended to spray the tiling by applying a hydrophobizing agent. This capillary closure closes and extends its lifetime. The hydrophobizing agent does not change the color of the tiles.
8. Notice
a) All recommendations and practices are our best practical experience. For buildings with specific requirements, it is advisable to consult with the experts.
b) WARNING for rain when tiling is applied or just after finishing. When clinging to a crack, it may cause severe rain to wash off fresh glue and thus dirty the tiles. Therefore, it is recommended to cover the tiles with a plastic or other tarpaulin after finishing the work.
c) WARNING for outdoor bonding temperatures, which are always specified by the individual sealant manufacturers. Beware of both minimum and maximum outdoor temperatures.
d) WARNING for contact with water tiles / washing, cleaning etc., when immediately after gluing, the so-called secondary efflorescence may occur. The tiling is able to resist weathering after proper adhesion of the adhesive, jointing compound and final impregnation.
e) ATTENTION on the transport of tiles.
f) This is a manual production of tiles where different colors can occur. It is necessary to mix when gluing.
The tiles can be glued after 28 days from the date of manufacture.
The production date is given on the packaging.